网站的联网信息怎么填seo整站优化方案案例
pytorch框架基于retinaface实现face检测
- 简介
- 模型结构
- MobileNet-0.25
- SSH结构
- Head结构
- Anchor编解码
- 环境
- 开发环境
- 数据
- 简介
- 训练
- 测试
- 参考
简介
RetinaFace是在RetinaNet基础上引申出来的人脸检测框架,所以大致结构和RetinaNet非常像。
主要改进:1.MobileNet-0.25作为Backbone,当然也有ResNet版本。2.Head中增加关键点检测。3.Multi-task Loss4.论文地址:https://arxiv.org/pdf/1905.00641.pdf5.官方代码(mxnet):https://github.com/deepinsight/insightface/tree/master/RetinaFace6.大牛Pytorch版:oaifaye/retinafaceoaifaye/retinafaceoaifaye/retinaface
模型结构
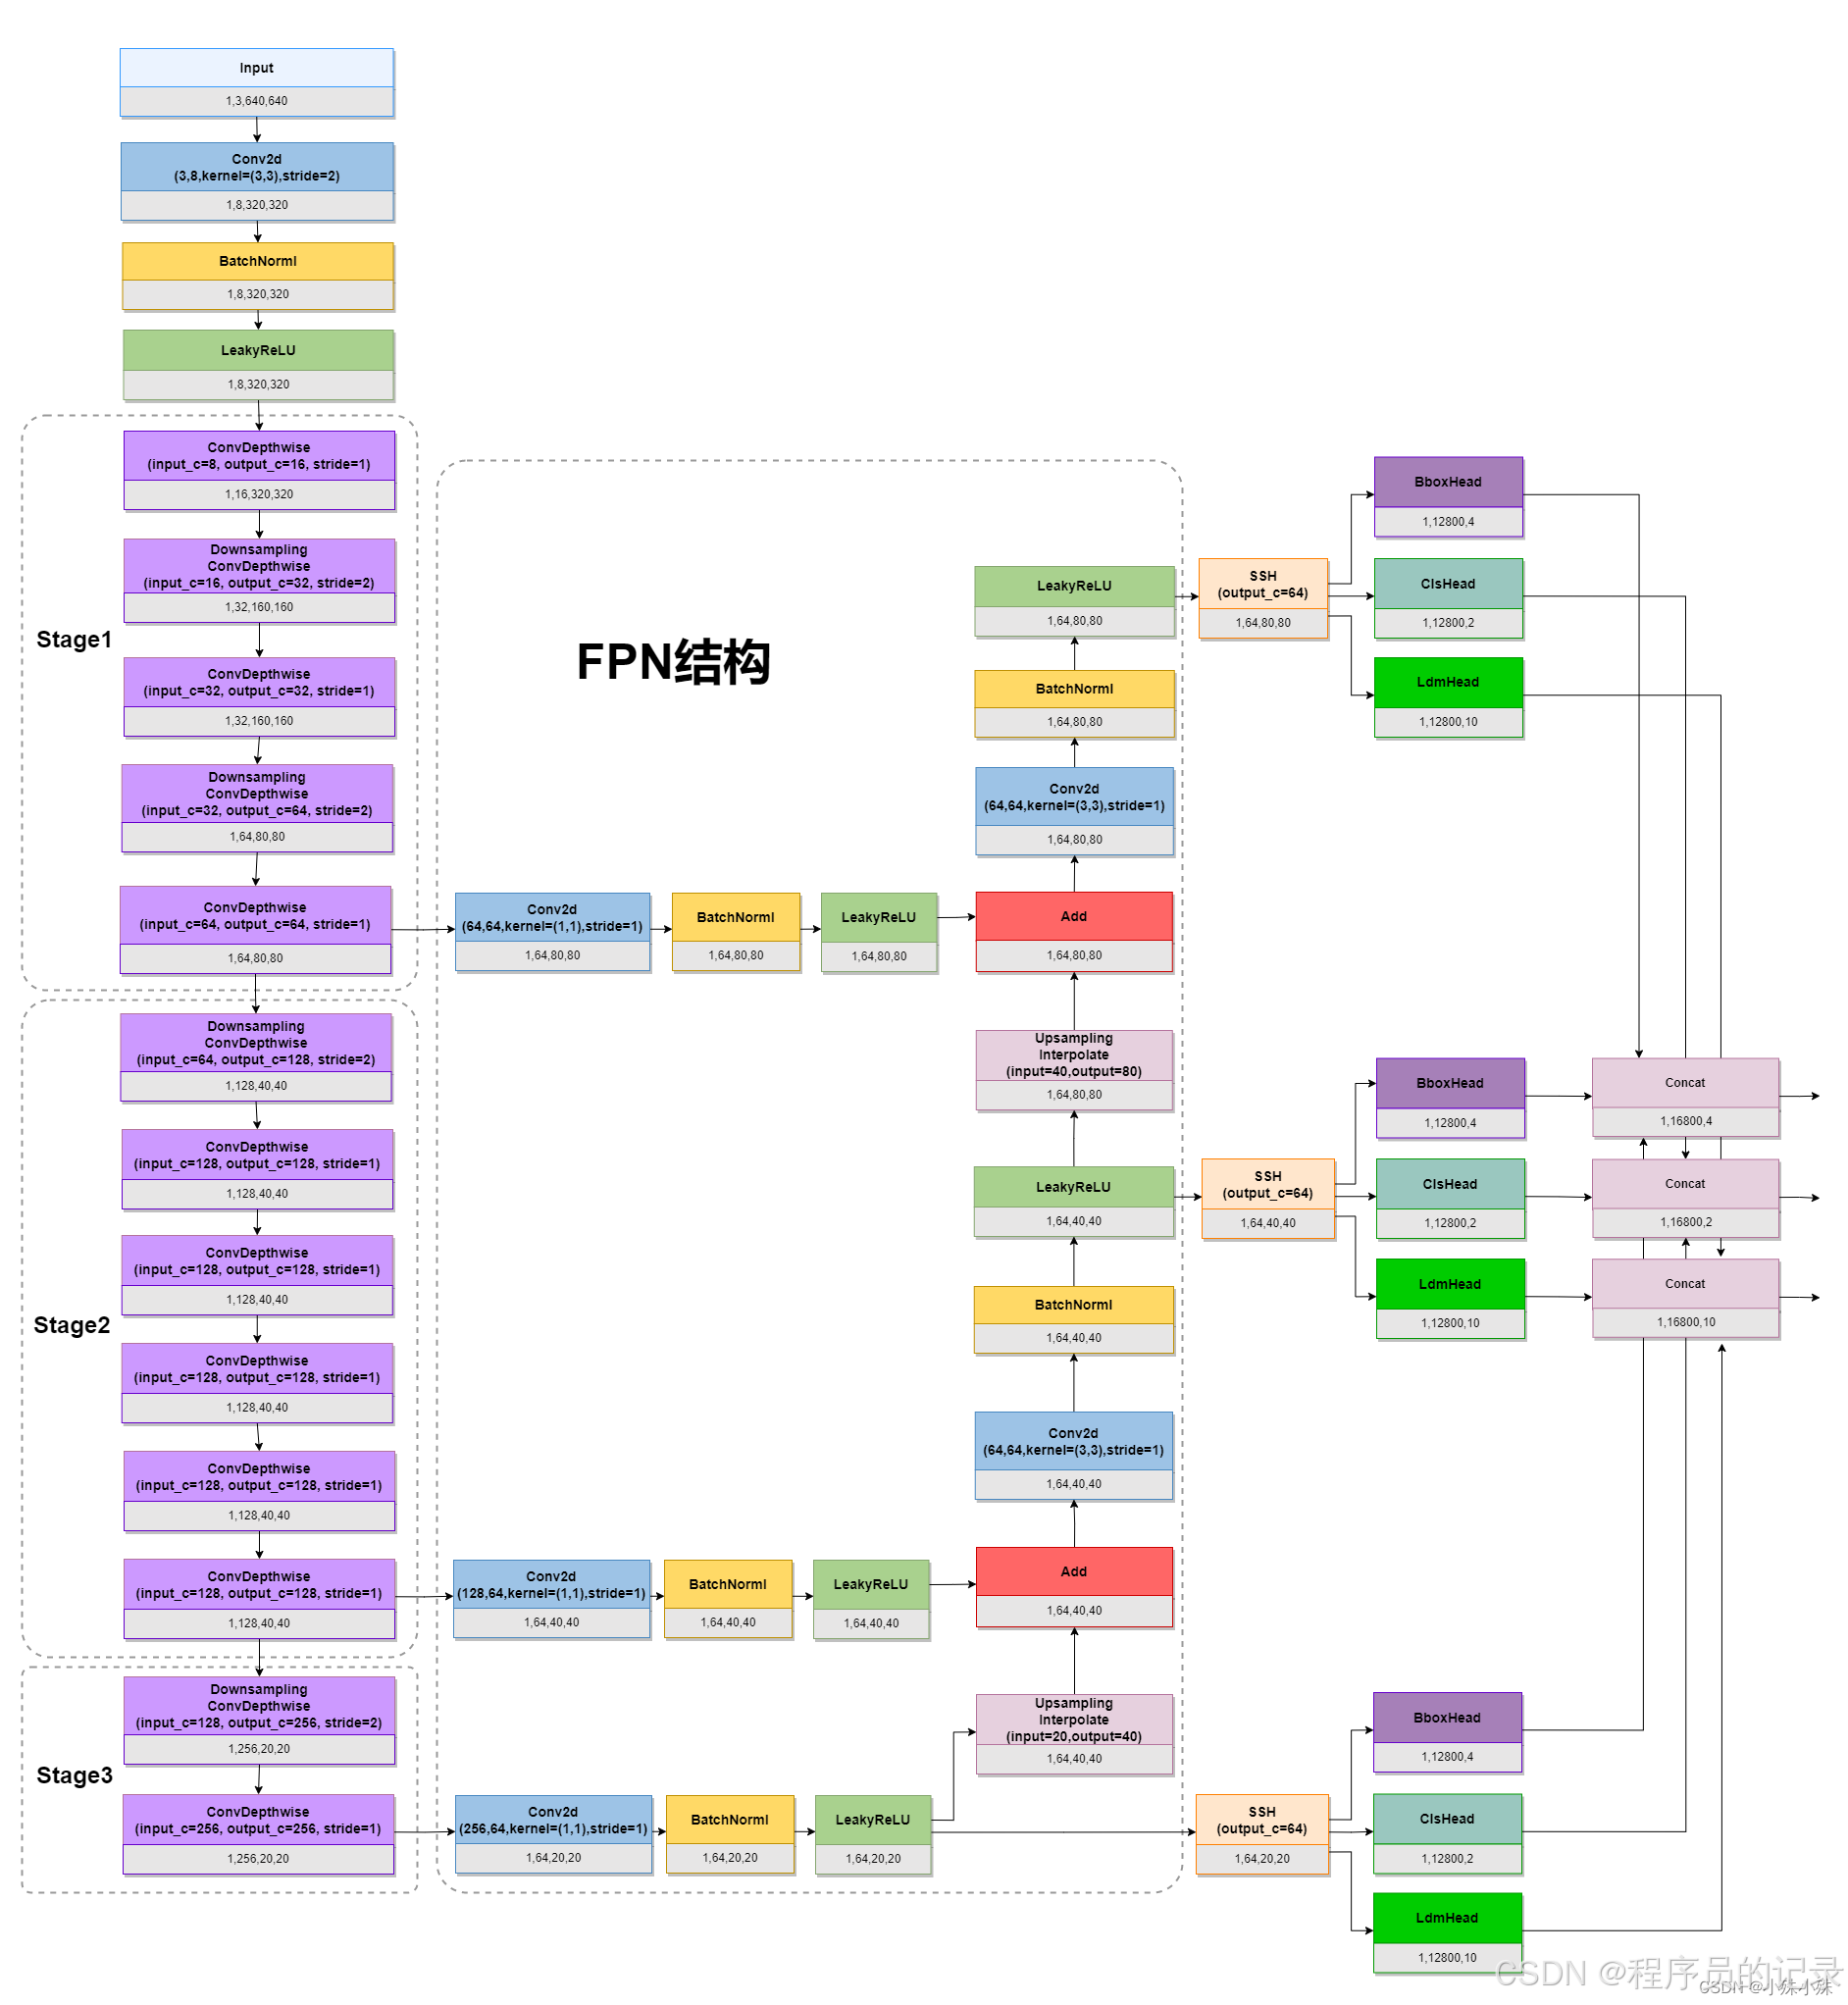
MobileNet-0.25
图中ConvDepthwise指MobileNet中的Depthwise Separable Convolution(深度可分离卷积),常规卷积在提取图像 特征图内特征相关性 的同时也提取 特征图通道间特征相关性,这样参数多而且难以解释。ConvDepthwise将这两项工作分开来做,减少了参数而且提高了可解释性。
ConvDepthwise结构如下:先做3x3的卷积,并且groups设置成输入通道数,这组卷积核只负责提取每个特征图的特征,同时计算量大大减少然后做1x1的卷积用于改变通道数,这组1x1的卷积核只提取通道间的特征相关性,同时参数大大减少。两组操作处理后计算量和参数量降低,可解释性提升。
# 代码实现
def conv_dw(inp, oup, stride = 1, leaky=0.1):return nn.Sequential(nn.Conv2d(inp, inp, 3, stride, 1, groups=inp, bias=False),nn.BatchNorm2d(inp),nn.LeakyReLU(negative_slope= leaky,inplace=True),nn.Conv2d(inp, oup, 1, 1, 0, bias=False),nn.BatchNorm2d(oup),nn.LeakyReLU(negative_slope= leaky,inplace=True),)
 ### FPN结构 FPN 特征金字塔,多用于目标检测,因为目标有大有小,所以不同的特征层做融合有助于检测不同尺度的目标。
这里FPN取了三个关键特征层,然后将通道数都处理成64,这样三个关键特征层由浅到深分别是1,64,80,80、1,64,40,40、1,64,20,20。深层的关键特征层经过2x的Upsampling与浅层进行融合,最后三个融合后的分支分别输出到SSH结构。
SSH结构
SSH(Single Stage Headless)模块可以进一步增加感受野,进一步加强特征提取, SSH利用的也是多尺度特征融合的思想,融合了三路不同深度的特征,最后cancat到一起,输出和输入尺寸不变。结构如下:

class SSH(nn.Module):def __init__(self, in_channel, out_channel):super(SSH, self).__init__()assert out_channel % 4 == 0leaky = 0if (out_channel <= 64):leaky = 0.1# 3x3卷积self.conv3X3 = conv_bn_no_relu(in_channel, out_channel//2, stride=1)# 利用两个3x3卷积替代5x5卷积self.conv5X5_1 = conv_bn(in_channel, out_channel//4, stride=1, leaky = leaky)self.conv5X5_2 = conv_bn_no_relu(out_channel//4, out_channel//4, stride=1)# 利用三个3x3卷积替代7x7卷积self.conv7X7_2 = conv_bn(out_channel//4, out_channel//4, stride=1, leaky = leaky)self.conv7x7_3 = conv_bn_no_relu(out_channel//4, out_channel//4, stride=1)def forward(self, inputs):conv3X3 = self.conv3X3(inputs)conv5X5_1 = self.conv5X5_1(inputs)conv5X5 = self.conv5X5_2(conv5X5_1)conv7X7_2 = self.conv7X7_2(conv5X5_1)conv7X7 = self.conv7x7_3(conv7X7_2)# 所有结果堆叠起来out = torch.cat([conv3X3, conv5X5, conv7X7], dim=1)out = F.relu(out)return out
Head结构
Head分三种:BboxHead:框的回归预测结果用于对先验框进行调整获得预测框,即解码前的bounding box的中心点偏移量和宽高。ClsHead:分类预测结果用于判断先验框内部是否包含脸。LdmHead:解码前的五官关键点坐标。
每个单元的使用两个1:1比例的Anchor(anchor_num=2),三个Head结构如下图。
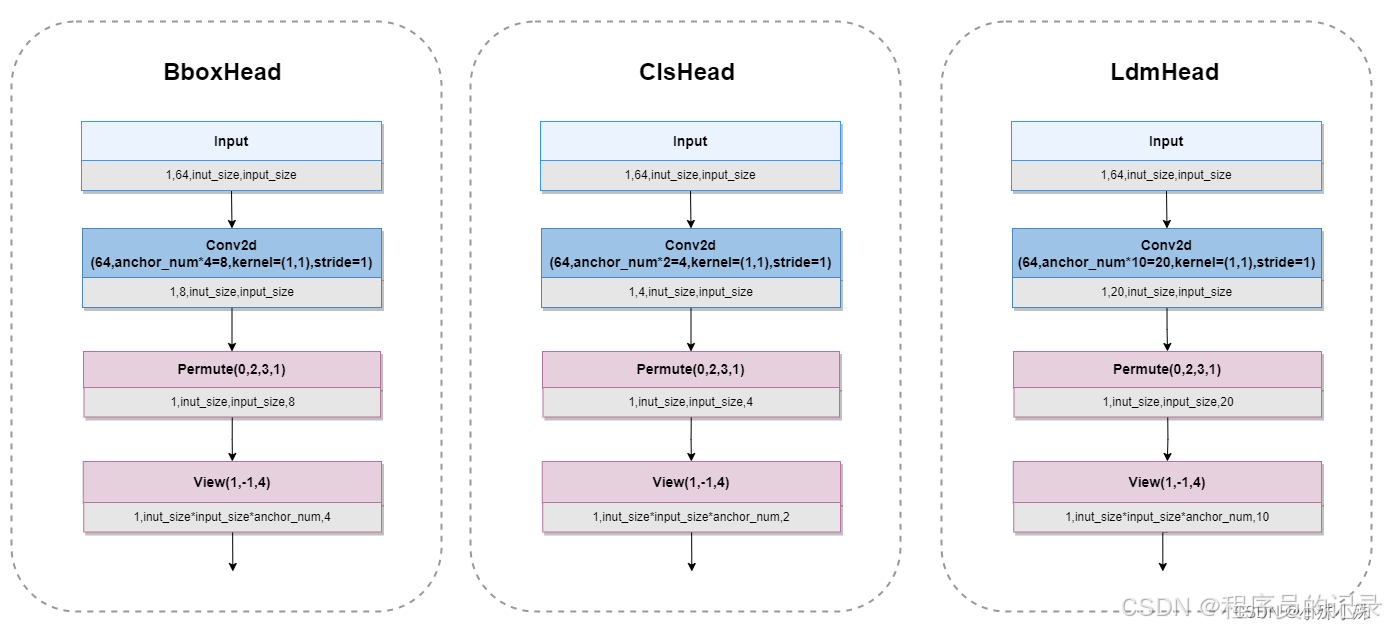
class ClassHead(nn.Module):def __init__(self,inchannels=512,num_anchors=2):super(ClassHead,self).__init__()self.num_anchors = num_anchorsself.conv1x1 = nn.Conv2d(inchannels,self.num_anchors*2,kernel_size=(1,1),stride=1,padding=0)def forward(self,x):out = self.conv1x1(x)out = out.permute(0,2,3,1).contiguous()return out.view(out.shape[0], -1, 2)class BboxHead(nn.Module):def __init__(self,inchannels=512,num_anchors=2):super(BboxHead,self).__init__()self.conv1x1 = nn.Conv2d(inchannels,num_anchors*4,kernel_size=(1,1),stride=1,padding=0)def forward(self,x):out = self.conv1x1(x)out = out.permute(0,2,3,1).contiguous()out = out.view(out.shape[0], -1, 4)return outclass LandmarkHead(nn.Module):def __init__(self,inchannels=512,num_anchors=2):super(LandmarkHead,self).__init__()self.conv1x1 = nn.Conv2d(inchannels,num_anchors*10,kernel_size=(1,1),stride=1,padding=0)def forward(self,x):out = self.conv1x1(x)out = out.permute(0,2,3,1).contiguous()return out.view(out.shape[0], -1, 10)
Anchor编解码
环境
开发环境
- GPU服务器:pytorch1.13.0,python3.10,cuda==11.7
- nvidia-smi 查看 CUDA 版本
conda create -n retinaface python=3.7
conda activate retinaface
pip3 install torch torchvision torchaudio -i https://pypi.tuna.tsinghua.edu.cn/simple
pip3 install tensorboard scipy numpy matplotlib -i https://pypi.tuna.tsinghua.edu.cn/simple
pip3 install opencv_python Pillow==9.4.0 h5py -i https://pypi.tuna.tsinghua.edu.cn/simple
pip3 install tqdm -i https://pypi.tuna.tsinghua.edu.cn/simple
数据
简介
Wider Face数据集,标记使用retinaface_gt_v1.1.zip
训练
测试
参考
通俗解读人脸检测框架-RetinaFace