网站制作费一般多少aso安卓优化公司
在去年2022年曾发布一篇关于脚手架的文章:“Android JetPack Compose组件中Scaffold的应用” 。但是Android的版本从12变更到13及以上版本,导致一些细节的实现存在不同。在本文中,将从头开始介绍整个脚手架的搭建过程。
一、新建项目模块
在Android Studio(版本是Graffie)中新建模块,选择“Empty Activity",如图1所示。

图1
二、定义脚手架Scaffold
@OptIn(ExperimentalMaterial3Api::class)
@SuppressLint("UnusedMaterial3ScaffoldPaddingParameter")
@Composable
fun MainScreen(){Scaffold(//定义头部topBar = {},//定义底部导航bottomBar = {},//定义信息提示区snackbarHost = {},//定义悬浮按钮floatingActionButton = {},content = {//content定义中心区})
或也可以定义成如下形式:
@OptIn(ExperimentalMaterial3Api::class)
@SuppressLint("UnusedMaterial3ScaffoldPaddingParameter")
@Composable
fun MainScreen(){Scaffold(//定义头部topBar = {},//定义底部导航bottomBar = {},//定义信息提示区snackbarHost = {},//定义悬浮按钮floatingActionButton = {}){//content定义中心区}
}
与原来:“Android JetPack Compose组件中Scaffold的应用” 最大的不同在于现在Android13版本的Scaffold取消了drawerContent的属性,因此,导致对于侧滑菜单的定义发生变化。
三、创建三个不同界面
首先,定义一个通用的界面:
@Composable
fun DisplayScreen(title:String, preColor: Color=Color.Black, backgroundColor:Color=colorResource(R.color.teal_200)){Box(contentAlignment= Alignment.Center,modifier = Modifier.fillMaxSize().background(backgroundColor)){Text(text = title,fontSize = 30.sp,color = preColor)}
}
然后,定义的三个不同的界面分别调用上述的DisplayScreen组合函数,代码分别如下,运行效果如图2所示。
@Composable
fun HomeScreen(){DisplayScreen(title = "首页")
}
@Composable
fun SettingScreen(){DisplayScreen(title = "配置")
}
@Composable
fun HelpScreen(){DisplayScreen(title = "帮助和支持")
}
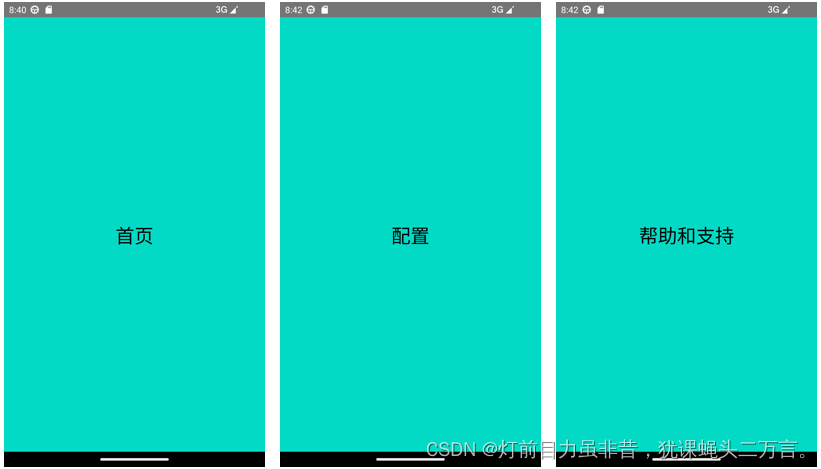
图2
为了方便后续对这三个界面的切换,定义一个通用的密封类Screen,代码如下
/*** 定义要切换界面的密封类Screen* @property route String 导航线路名* @property title String  标题* @property icon ImageVector 图标* @property loadScreen [@androidx.compose.runtime.Composable] Function0<Unit> 加载动作处理* @constructor*/
sealed class Screen(val route:String, val title:String, val icon: ImageVector, val loadScreen: @Composable ()->Unit){object Home:Screen("home","首页", Icons.Filled.Home,loadScreen={HomeScreen()})object Setting:Screen("setting","配置",Icons.Filled.Settings, loadScreen = {SettingScreen()})object Help:Screen("help","帮助和支持",Icons.Filled.Info, loadScreen = {HelpScreen()})
}
在此前提下定义一个保存要显示界面的列表:
val screens = listOf(Screen.Home,Screen.Setting,Screen.Help)
四、定义底部导航栏
@Composable
fun BottomView(currentScreen: MutableState<Screen>){BottomAppBar {screens.forEach {NavigationBarItem(selected = currentScreen.value.route == it.route,onClick = {//定义点击动作currentScreen.value = it},icon = {Column(horizontalAlignment = Alignment.CenterHorizontally){Icon(imageVector = it.icon,tint = Color.Blue,contentDescription = it.title)Text(text = it.title,fontSize = 20.sp)}})}}
}
然后在Scaffold中进行调用,因为需要保存一个当前屏幕的状态,因此在MainScreen增加一个currentScreen的状态值,修改MainScreen()如下所示。
@OptIn(ExperimentalMaterial3Api::class)
@SuppressLint("UnusedMaterial3ScaffoldPaddingParameter")
@Composable
fun MainScreen(){val currentState:MutableState<Screen> = remember{mutableStateOf(Screen.Home)}Scaffold(//定义头部topBar = {},//定义底部导航bottomBar = {BottomView(currentScreen = currentState)},//定义信息提示区snackbarHost = {},//定义悬浮按钮floatingActionButton = {}){//content定义中心区currentState.value.loadScreen()}
}
这时运行效果如图3所示。
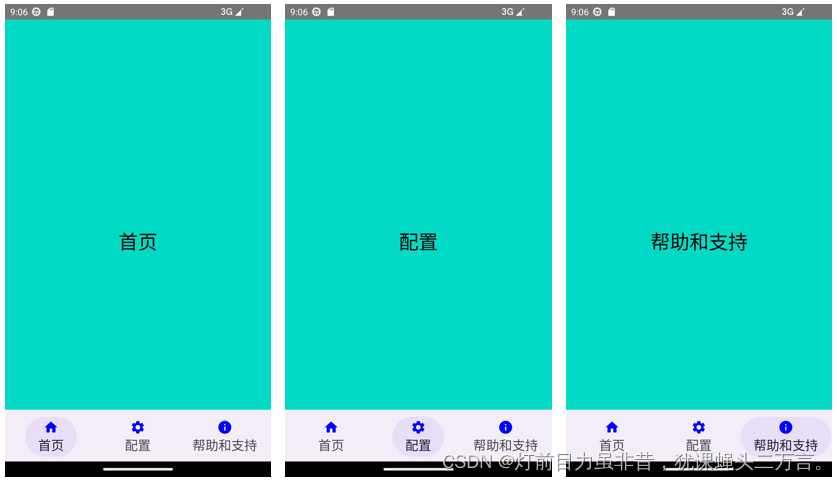
图3
通过选择底部不同的按钮,可以切换到不同的界面,如图3所示。
五、定义顶部栏
定义顶部栏需要解决两个问题:(1)需要在顶部栏定义顶部的右侧导航菜单;(2)需要定义顶部的导航按钮,使得启动侧滑菜单;
1.定义顶部的后侧菜单
@Composable
fun MenuView(currentScreen: MutableState<Screen>, expandedState:MutableState<Boolean>){DropdownMenu(expanded = expandedState.value,onDismissRequest = {expandedState.value = false}) {screens.forEach {DropdownMenuItem(leadingIcon = {Icon(imageVector = it.icon,contentDescription = it.title)},text = {Text(text = it.title,fontSize = 20.sp)}, onClick = {currentScreen.value = it})}}
}
然后再修改MainScreen,通过一个状态参数expandedState的值判断是否打开菜单,这时修改的MainScreen的代码如下:
@OptIn(ExperimentalMaterial3Api::class)
@SuppressLint("UnusedMaterial3ScaffoldPaddingParameter")
@Composable
fun MainScreen(){//保存当前界面val currentState:MutableState<Screen> = remember{mutableStateOf(Screen.Home)}//记录菜单是否可以扩展val expandedState = remember{mutableStateOf(false)}Scaffold(//定义头部topBar = {TopAppBar(//左侧的文本title = { /*TODO*/ },//导航图标navigationIcon = {},//按行处理的交互actions = {IconButton(onClick={expandedState.value = !expandedState.value}){Icon(imageVector = Icons.Filled.MoreVert,contentDescription = "More...")if(expandedState.value)MenuView(currentState, expandedState)}})},//定义底部导航bottomBar = {BottomView(currentScreen = currentState)},//定义信息提示区snackbarHost = {},//定义悬浮按钮floatingActionButton = {}){//content定义中心区currentState.value.loadScreen()}
}
这时,代码的运行效果如图4所示。
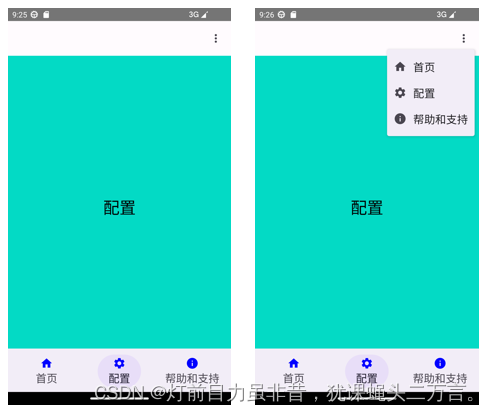
图4
如图4所示,可以发现右上角出现了更多的图标,点击该图标会弹出一个菜单,通过这个菜单可以切换不同的界面。
2.定义顶部栏的导航按钮启动侧滑菜单
定义侧滑菜单的内容,代码如下所示:
@OptIn(ExperimentalMaterial3Api::class)
@Composable
fun DrawerView(currentScreen: MutableState<Screen>, drawerState: DrawerState,scope:CoroutineScope){ModalNavigationDrawer(drawerState = drawerState,drawerContent = {Column(verticalArrangement = Arrangement.Center,modifier = Modifier.fillMaxHeight().width(360.dp).background(Color.White)){screens.forEach {NavigationDrawerItem(label = {Text(it.title,fontSize = 30.sp)},icon={Icon(imageVector = it.icon,tint=Color.Green,contentDescription = null)},selected = it.route==currentScreen.value.route,onClick = {scope.launch {currentScreen.value = itdrawerState.close()}})}}}) {currentScreen.value.loadScreen()}
}
在此基础上,修改MainScreen,使得点击顶部栏的导航按钮可以弹出侧滑菜单:
@OptIn(ExperimentalMaterial3Api::class)
@SuppressLint("UnusedMaterial3ScaffoldPaddingParameter")
@Composable
fun MainScreen(){val currentState:MutableState<Screen> = remember{mutableStateOf(Screen.Home)}val expandedState = remember{mutableStateOf(false)}val drawerState = rememberDrawerState(initialValue = DrawerValue.Closed)val scope = rememberCoroutineScope()Scaffold(//定义头部topBar = {TopAppBar(//左侧的文本title = {Text("侧滑菜单")},//导航图标navigationIcon = {IconButton(onClick={scope.launch {drawerState.open()}}){Icon(imageVector = Icons.Filled.ArrowForward,contentDescription = "弹出侧滑菜单")}},//按行处理的交互actions = {IconButton(onClick={expandedState.value = !expandedState.value}){Icon(imageVector = Icons.Filled.MoreVert,contentDescription = "More...")if(expandedState.value)MenuView(currentState, expandedState)}})},//定义底部导航bottomBar = {BottomView(currentScreen = currentState)},//定义信息提示区snackbarHost = {},//定义悬浮按钮floatingActionButton = {}){ //content定义中心区//直接调用侧滑界面DrawerView(currentState, drawerState, scope )}
}
注意在MainScreen中的Scaffold的中心区修改为调用drawerView组合函数,并增加DrawerState状态值控制侧滑菜单的启动和关闭,通过调用drawerState的open函数和close函数分别实现。因为drawerState的open函数和close函数均为suspend挂起函数,需要在协程中运行,因此还增加了一个scope的参数,用它来加载drawerState的open函数和close函数。
这时,点击顶部栏的导航图标,运行效果如图5所示。
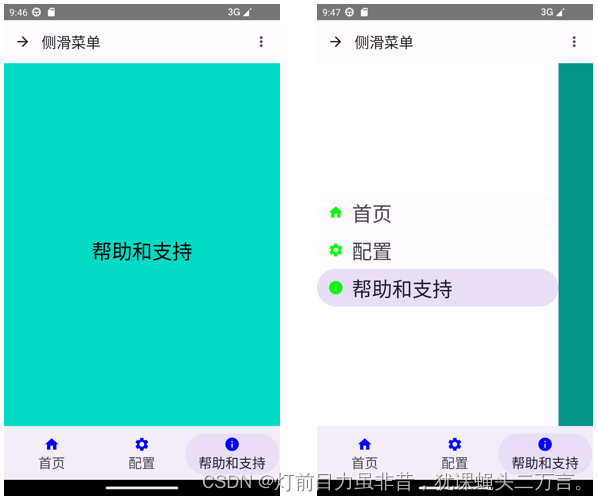
图5
六、定义悬浮按钮
悬浮按钮定义在Scaffold脚手架的floatingActionButton属性对应的部分,下列将定义一个悬浮按钮,使得点击该按钮可以返回到首页。代码如下:
@OptIn(ExperimentalMaterial3Api::class)
@SuppressLint("UnusedMaterial3ScaffoldPaddingParameter")
@Composable
fun MainScreen(){val currentState:MutableState<Screen> = remember{mutableStateOf(Screen.Home)}val expandedState = remember{mutableStateOf(false)}val drawerState = rememberDrawerState(initialValue = DrawerValue.Closed)val scope = rememberCoroutineScope()Scaffold(......//定义悬浮按钮floatingActionButton = {FloatingActionButton(onClick = {currentState.value = Screen.Home}) {Icon(imageVector = Icons.Filled.Refresh,contentDescription = "返回")}}){ //content定义中心区DrawerView(currentState, drawerState, scope )}
}
运行效果如图6所示。
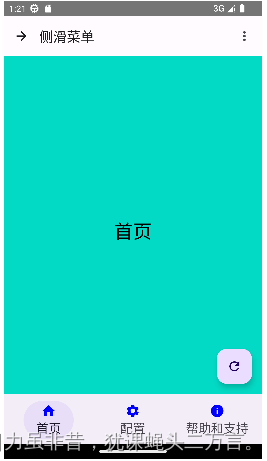
图6
七、定义信息栏
定义一个信息栏增加一个状态值displayedSnackState,通过它来修改信息栏显示的控制。代码示例如下:
@Composable
fun MainScreen(){val currentState:MutableState<Screen> = remember{mutableStateOf(Screen.Home)}val expandedState = remember{mutableStateOf(false)}val drawerState = rememberDrawerState(initialValue = DrawerValue.Closed)val scope = rememberCoroutineScope()val displayedSnackState = remember { mutableStateOf(false)}Scaffold(//定义头部topBar = {TopAppBar(//左侧的文本title = {Text("侧滑菜单")},//导航图标navigationIcon = {IconButton(onClick={scope.launch {drawerState.open()}}){Icon(imageVector = Icons.Filled.ArrowForward,contentDescription = "弹出侧滑菜单")}},//按行处理的交互actions = {IconButton(onClick={expandedState.value = !expandedState.value}){Icon(imageVector = Icons.Filled.MoreVert,contentDescription = "More...")if(expandedState.value)MenuView(currentState, expandedState)}})},//定义底部导航bottomBar = {BottomView(currentScreen = currentState)},//定义信息提示区snackbarHost = {if(displayedSnackState.value){Snackbar(modifier = Modifier.fillMaxWidth().background(Color.Blue),) {Text("提示信息:返回首页",fontSize = 24.sp)}}},//定义悬浮按钮floatingActionButton = {FloatingActionButton(onClick = {currentState.value = Screen.HomedisplayedSnackState.value = !displayedSnackState.value}) {Icon(imageVector = Icons.Filled.Refresh,contentDescription = "返回")}}){ //content定义中心区DrawerView(currentState, drawerState, scope )}
}
运行结果如图7所示:
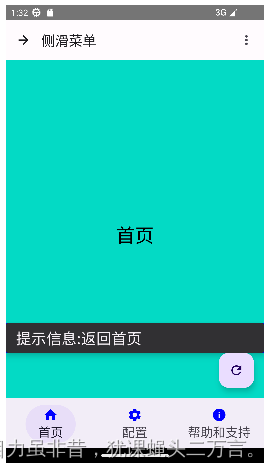
图7
八、状态优化的处理
在上述的处理过程中,可以发现MainScreen中定义了很多的状态值,这些状态值往往需要作为函数的参数进行传递,处理过程复杂,可以对这些状态值做一个优化处理。
首先,定义一个类,保存各种需要的状态。代码如下:
@OptIn(ExperimentalMaterial3Api::class)
class StateHolder(val currentScreen:MutableState<Screen>,val expandedState: MutableState<Boolean>,val drawerState: DrawerState,val displayedSnackState:MutableState<Boolean>,val scope:CoroutineScope)
然后再定义一个组合函数获取所有的状态值,代码如下:
@OptIn(ExperimentalMaterial3Api::class)
@Composable
fun rememberStates(currentScreen: MutableState<Screen> = remember { mutableStateOf(Screen.Home) },expandedState: MutableState<Boolean> = remember { mutableStateOf(false) },drawerState: DrawerState = rememberDrawerState(initialValue = DrawerValue.Closed),displayedSnackState: MutableState<Boolean> = remember{mutableStateOf(false)},scope: CoroutineScope = rememberCoroutineScope(),
)=StateHolder(currentScreen,expandedState,drawerState,displayedSnackState,scope)
在此前提的基础上,修改代码,这时以MainScreen为例:
@Composable
fun MainScreen(){val states = rememberStates()Scaffold(//定义头部topBar = {TopAppBar(//左侧的文本title = {Text("侧滑菜单")},//导航图标navigationIcon = {IconButton(onClick={states.scope.launch {states.drawerState.open()}}){Icon(imageVector = Icons.Filled.ArrowForward,contentDescription = "弹出侧滑菜单")}},//按行处理的交互actions = {IconButton(onClick={states.expandedState.value = !states.expandedState.value}){Icon(imageVector = Icons.Filled.MoreVert,contentDescription = "More...")if(states.expandedState.value)MenuView(states)}})},//定义底部导航bottomBar = {BottomView(states)},//定义信息提示区snackbarHost = {if(states.displayedSnackState.value){Snackbar(modifier = Modifier.fillMaxWidth().background(Color.Blue),) {Text("提示信息:返回首页",fontSize = 24.sp)}}},//定义悬浮按钮floatingActionButton = {FloatingActionButton(onClick = {states.currentScreen.value = Screen.Homestates.displayedSnackState.value = !states.displayedSnackState.value}) {Icon(imageVector = Icons.Filled.Refresh,contentDescription = "返回")}}){ //content定义中心区DrawerView(states)}
}
同时对MainScreen调用的MenuView、BottomView和DrawerView中需要传递状态参数的函数进行修改,修改的代码分别是:
MenuView的定义
@OptIn(ExperimentalMaterial3Api::class)
@Composable
fun MenuView(states:StateHolder){DropdownMenu(expanded = states.expandedState.value,onDismissRequest = {states.expandedState.value = false}) {screens.forEach {DropdownMenuItem(leadingIcon = {Icon(imageVector = it.icon,contentDescription = it.title)},text = {Text(text = it.title,fontSize = 20.sp)}, onClick = {states.currentScreen.value = it})}}
}
BottomView的定义
@OptIn(ExperimentalMaterial3Api::class)
@Composable
fun BottomView(states:StateHolder){BottomAppBar {screens.forEach {NavigationBarItem(selected = states.currentScreen.value.route == it.route,onClick = {//定义点击动作states.currentScreen.value = it},icon = {Column(horizontalAlignment = Alignment.CenterHorizontally){Icon(imageVector = it.icon,tint = Color.Blue,contentDescription = it.title)Text(text = it.title,fontSize = 20.sp)}})}}
}
DrawerView的定义
@OptIn(ExperimentalMaterial3Api::class)
@Composable
fun DrawerView(states:StateHolder){ModalNavigationDrawer(drawerState = states.drawerState,drawerContent = {Column(verticalArrangement = Arrangement.Center,modifier = Modifier.fillMaxHeight().width(360.dp).background(Color.White)){screens.forEach {NavigationDrawerItem(label = {Text(it.title,fontSize = 30.sp)},icon={Icon(imageVector = it.icon,tint=Color.Green,contentDescription = null)},selected = it.route==states.currentScreen.value.route,onClick = {states.scope.launch {states.currentScreen.value = itstates.drawerState.close()}})}}}) {states.currentScreen.value.loadScreen()}
}
通过这样的方式,单一传递状态值在不同的组合函数共享。