十大网红公司百度seo优化培训
前言
如果写过SLAM14讲第一次的作业,或者看过我之前的运行ORB_SLAM2教程应该都安装过OpenCV了,如果没有安装,没关系,可以看我之前的博客,里面有如何安装OpenCV。
链接: 运行ORB-SLAM2(含OpenCV的安装)
文章目录
- 前言
- 1.OpenCV的图像操作
- 2.使用OpenCV进行RGB-D图像拼接(点云)
1.OpenCV的图像操作
让我们先来看一段代码,学习一下OpenCV的函数调用。
改代码中,演示了如下几个操作:图像读取,显示,像素遍历,复制,赋值等。大部分的注解已经写在代码中。编译该程序时,需要在CMakeLists.txt中添加OpenCV的头文件,然后将程序链接到库文件上。
imageBasics.cpp:
#include <iostream>
#include <chrono>
using namespace std;#include <opencv2/core/core.hpp>
#include <opencv2/highgui/highgui.hpp>int main ( int argc, char** argv )
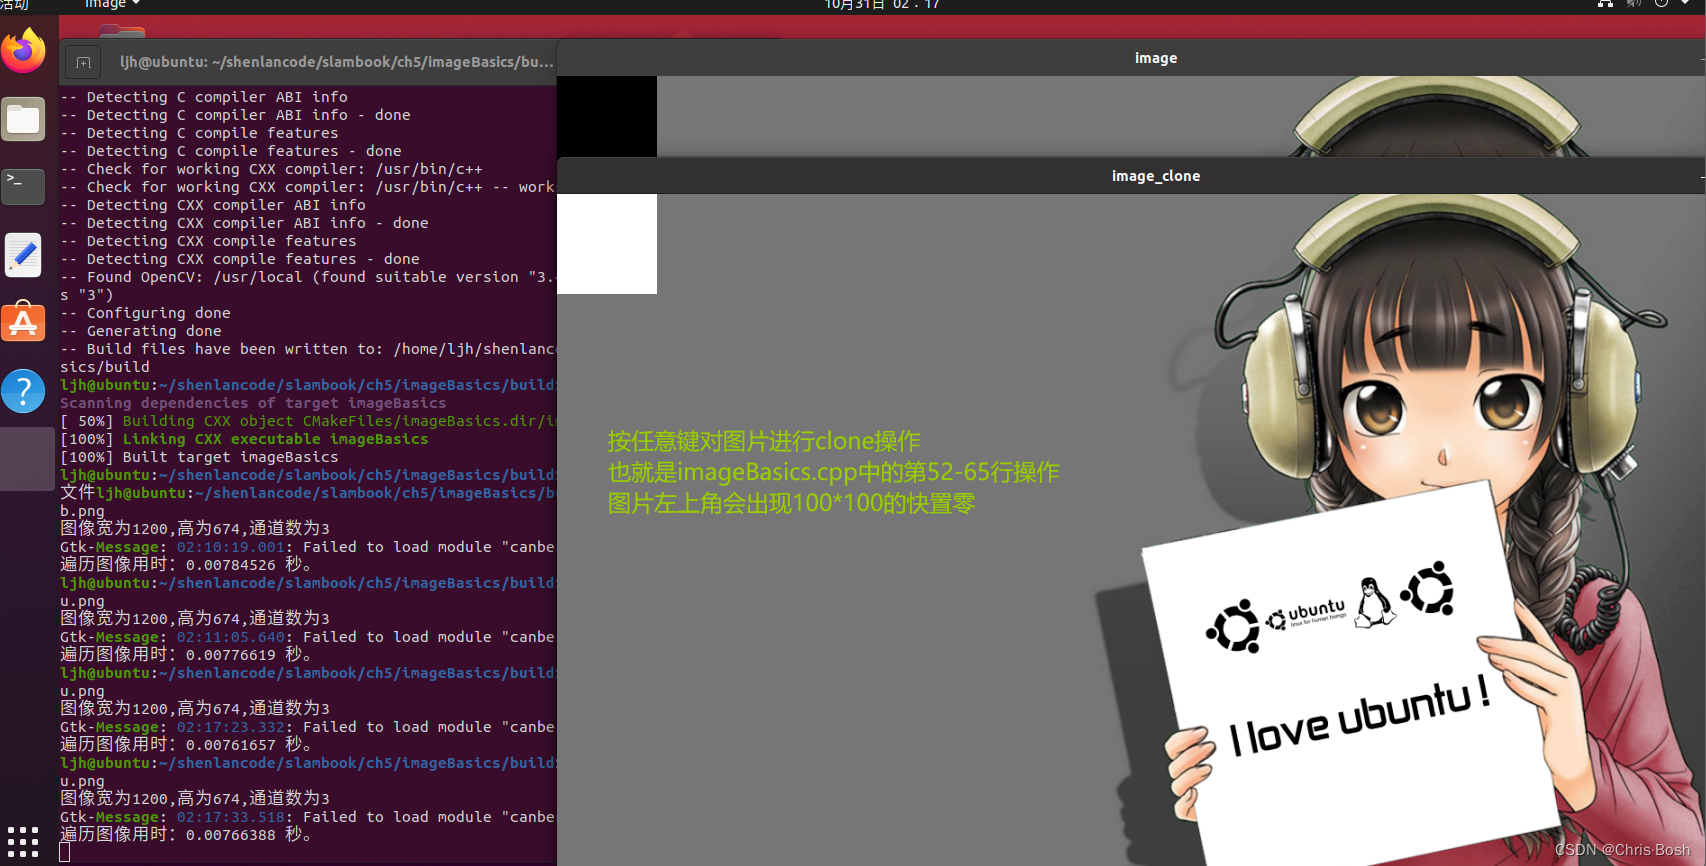
{// 读取argv[1]指定的图像cv::Mat image;image = cv::imread ( argv[1] ); //cv::imread函数读取指定路径下的图像// 判断图像文件是否正确读取if ( image.data == nullptr ) //数据不存在,可能是文件不存在{cerr<<"文件"<<argv[1]<<"不存在."<<endl;return 0;}// 文件顺利读取, 首先输出一些基本信息cout<<"图像宽为"<<image.cols<<",高为"<<image.rows<<",通道数为"<<image.channels()<<endl;cv::imshow ( "image", image ); // 用cv::imshow显示图像cv::waitKey ( 0 ); // 暂停程序,等待一个按键输入// 判断image的类型if ( image.type() != CV_8UC1 && image.type() != CV_8UC3 ){// 图像类型不符合要求cout<<"请输入一张彩色图或灰度图."<<endl;return 0;}// 遍历图像, 请注意以下遍历方式亦可使用于随机像素访问// 使用 std::chrono 来给算法计时chrono::steady_clock::time_point t1 = chrono::steady_clock::now();for ( size_t y=0; y<image.rows; y++ ){// 用cv::Mat::ptr获得图像的行指针unsigned char* row_ptr = image.ptr<unsigned char> ( y ); // row_ptr是第y行的头指针for ( size_t x=0; x<image.cols; x++ ){// 访问位于 x,y 处的像素unsigned char* data_ptr = &row_ptr[ x*image.channels() ]; // data_ptr 指向待访问的像素数据// 输出该像素的每个通道,如果是灰度图就只有一个通道for ( int c = 0; c != image.channels(); c++ ){unsigned char data = data_ptr[c]; // data为I(x,y)第c个通道的值}}}chrono::steady_clock::time_point t2 = chrono::steady_clock::now();chrono::duration<double> time_used = chrono::duration_cast<chrono::duration<double>>( t2-t1 );cout<<"遍历图像用时:"<<time_used.count()<<" 秒。"<<endl;// 关于 cv::Mat 的拷贝// 直接赋值并不会拷贝数据cv::Mat image_another = image;// 修改 image_another 会导致 image 发生变化image_another ( cv::Rect ( 0,0,100,100 ) ).setTo ( 0 ); // 将左上角100*100的块置零cv::imshow ( "image", image );cv::waitKey ( 0 );// 使用clone函数来拷贝数据cv::Mat image_clone = image.clone();image_clone ( cv::Rect ( 0,0,100,100 ) ).setTo ( 255 );cv::imshow ( "image", image );cv::imshow ( "image_clone", image_clone );cv::waitKey ( 0 );// 对于图像还有很多基本的操作,如剪切,旋转,缩放等,限于篇幅就不一一介绍了,请参看OpenCV官方文档查询每个函数的调用方法.cv::destroyAllWindows();return 0;
}CMakeLists.txt:
cmake_minimum_required( VERSION 2.8 )
project( imageBasics )# 添加c++ 11标准支持
set( CMAKE_CXX_FLAGS "-std=c++11" )# 寻找OpenCV库
find_package( OpenCV 3 REQUIRED )
# 添加头文件
include_directories( ${OpenCV_INCLUDE_DIRS} )add_executable( imageBasics imageBasics.cpp )
# 链接OpenCV库
target_link_libraries( imageBasics ${OpenCV_LIBS} )
然后我们尝试使用OpenCV打开一张图片:

2.使用OpenCV进行RGB-D图像拼接(点云)
joinMap.cpp:
#include <iostream>
#include <fstream>
using namespace std;
#include <opencv2/core/core.hpp>
#include <opencv2/highgui/highgui.hpp>
#include <Eigen/Geometry>
#include <boost/format.hpp> // for formating strings
#include <pcl/point_types.h>
#include <pcl/io/pcd_io.h>
#include <pcl/visualization/pcl_visualizer.h>int main( int argc, char** argv )
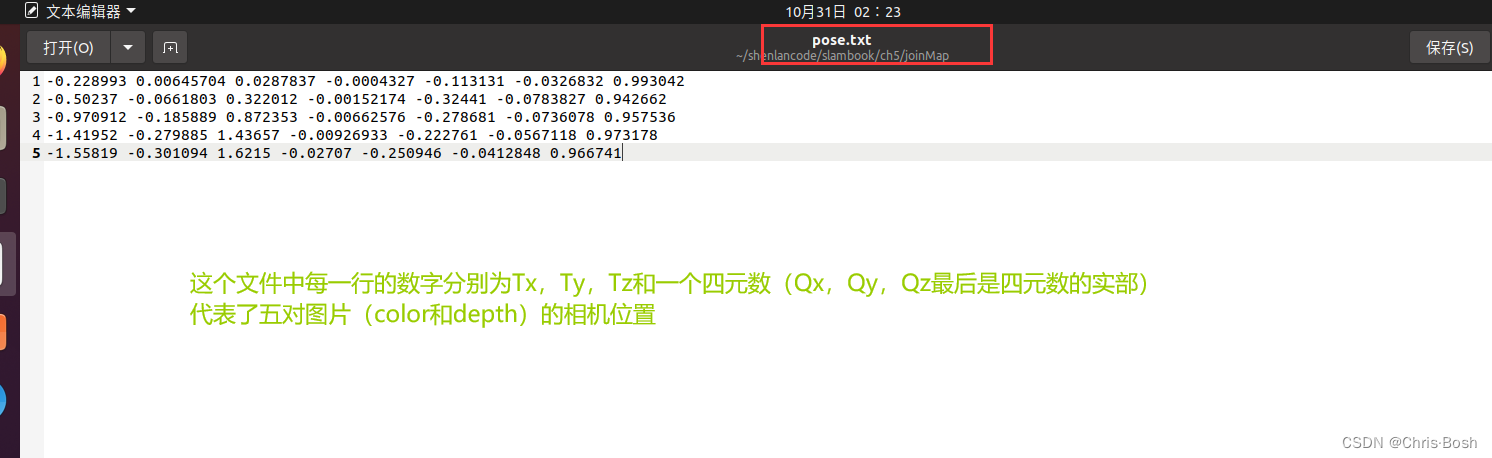
{vector<cv::Mat> colorImgs, depthImgs; // colorImgs:彩色图;depthImgs:深度图vector<Eigen::Isometry3d, Eigen::aligned_allocator<Eigen::Isometry3d>> poses; // 相机位姿//iftream的对象假设为fin,fin在读取数据的时候会根据你的输出对象来选择输出的方式。ifstream fin("./pose.txt");if (!fin){cerr<<"请在有pose.txt的目录下运行此程序"<<endl;return 1;}for ( int i=0; i<5; i++ ){boost::format fmt( "./%s/%d.%s" ); //图像文件格式colorImgs.push_back( cv::imread( (fmt%"color"%(i+1)%"png").str() ));/*cv::Mat img =cv::imread(argv[1],-1)函数原型Mat imread( const String& filename, int flags = IMREAD_COLOR );第一个参数是图片的绝对地址;第二个参数表示图片读入的方式(flags可以缺省,缺省时flags=1,表示以彩色图片方式读入图片);flags>0时表示以彩色方式读入图片;flags=0时表示以灰度图方式读入图片;flags<0时表示以图片的本来的格式读入图片;*/depthImgs.push_back( cv::imread( (fmt%"depth"%(i+1)%"pgm").str(), -1 )); // 使用-1读取原始图像double data[7] = {0};for ( auto& d:data )fin>>d; //将深度值文件一行一行读进d中Eigen::Quaterniond q( data[6], data[3], data[4], data[5] ); //旋转四元数Eigen::Isometry3d T(q);T.pretranslate( Eigen::Vector3d( data[0], data[1], data[2] )); //平移向量poses.push_back( T );}// 计算点云并拼接// 相机内参 double cx = 325.5;double cy = 253.5;double fx = 518.0;double fy = 519.0;double depthScale = 1000.0;cout<<"正在将图像转换为点云..."<<endl;// 定义点云使用的格式:这里用的是XYZRGBtypedef pcl::PointXYZRGB PointT; typedef pcl::PointCloud<PointT> PointCloud;// 新建一个点云PointCloud::Ptr pointCloud( new PointCloud ); for ( int i=0; i<5; i++ ){cout<<"转换图像中: "<<i+1<<endl; cv::Mat color = colorImgs[i]; //像素值 cv::Mat depth = depthImgs[i]; //每个像素值对应的深度值Eigen::Isometry3d T = poses[i]; //每张图片对应的位姿for ( int v=0; v<color.rows; v++ )for ( int u=0; u<color.cols; u++ ){unsigned int d = depth.ptr<unsigned short> ( v )[u]; // 深度值/*d==0:表示该像素点没有深度值(不可能),所以就抛弃该点,不再计算相机坐标系下的坐标值(X,Y,Z)*/if ( d==0 ) continue; // 为0表示没有测量到//point:相机坐标系下的坐标值(X,Y,Z)Eigen::Vector3d point; point[2] = double(d)/depthScale; point[0] = (u-cx)*point[2]/fx;point[1] = (v-cy)*point[2]/fy; // pointWorld:世界坐标Eigen::Vector3d pointWorld = T*point;// p:点云(每个点云按照[XYZRGB]的格式表示)PointT p ;p.x = pointWorld[0];p.y = pointWorld[1];p.z = pointWorld[2];p.b = color.data[ v*color.step+u*color.channels() ];p.g = color.data[ v*color.step+u*color.channels()+1 ];p.r = color.data[ v*color.step+u*color.channels()+2 ];pointCloud->points.push_back( p );}}pointCloud->is_dense = false;cout<<"点云共有"<<pointCloud->size()<<"个点."<<endl;pcl::io::savePCDFileBinary("map.pcd", *pointCloud );return 0;
}
CMakeLists.txt:
cmake_minimum_required( VERSION 2.8 )
project( joinMap )set( CMAKE_BUILD_TYPE Release )
set( CMAKE_CXX_FLAGS "-std=c++11 -O3" )# opencv
find_package( OpenCV REQUIRED )
include_directories( ${OpenCV_INCLUDE_DIRS} )# eigen
include_directories( "/usr/include/eigen3/" )# pcl
find_package( PCL REQUIRED COMPONENT common io )
include_directories( ${PCL_INCLUDE_DIRS} )
add_definitions( ${PCL_DEFINITIONS} )add_executable( joinMap joinMap.cpp )
target_link_libraries( joinMap ${OpenCV_LIBS} ${PCL_LIBRARIES} )
这里点云我们用的是pcl的库,所以需要安装一些pcl的库
安装命令如下:
sudo apt-get install libpcl-dev
sudo apt-get install pcl-tools
然后就可以进行编译,进入我们创建的build文件夹
cmake ..
make
cd ..
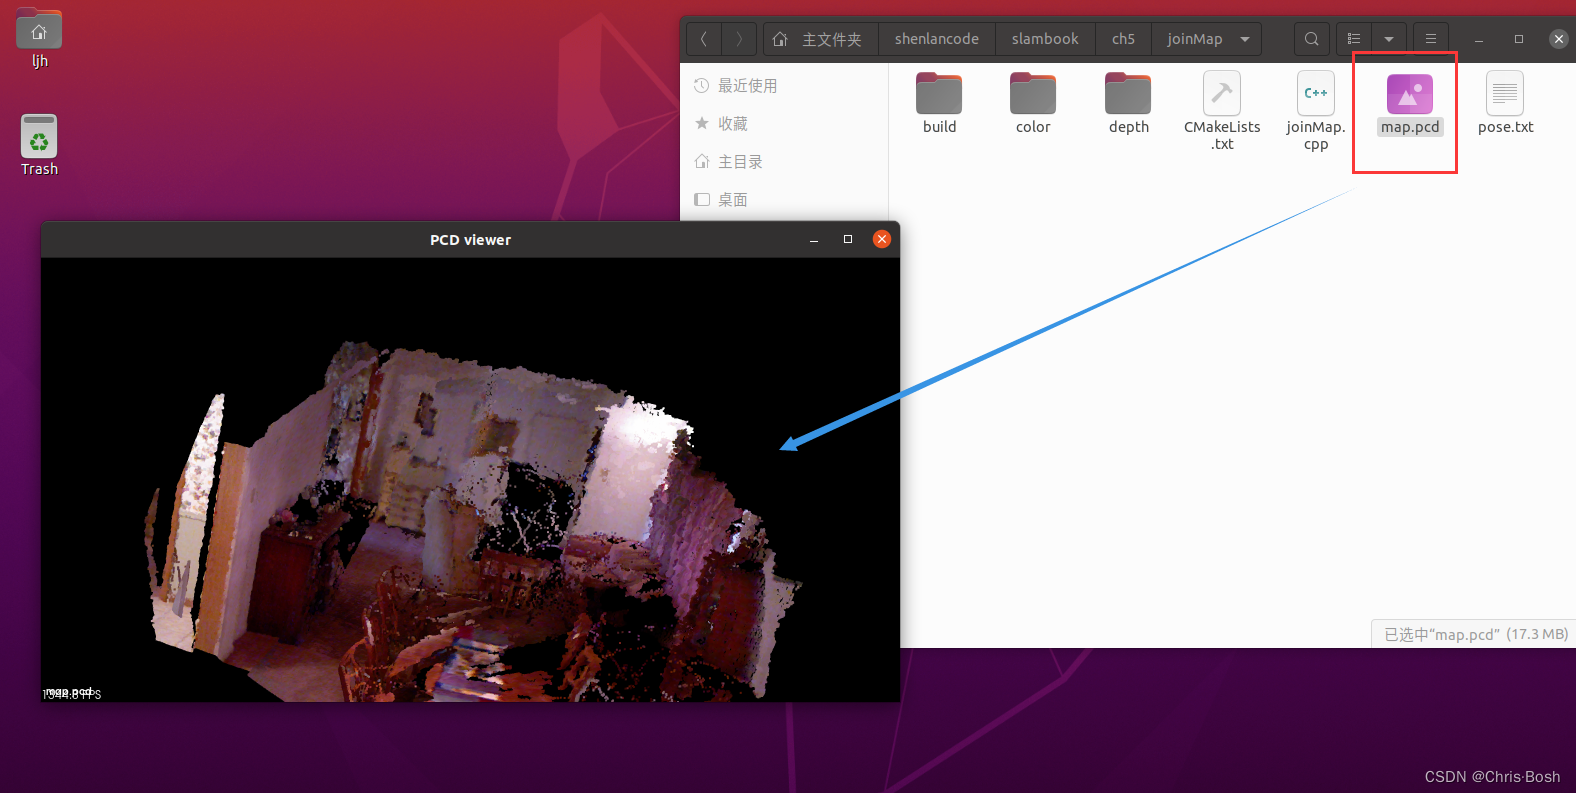
build/joinMap
pcl_viewer map.pcd
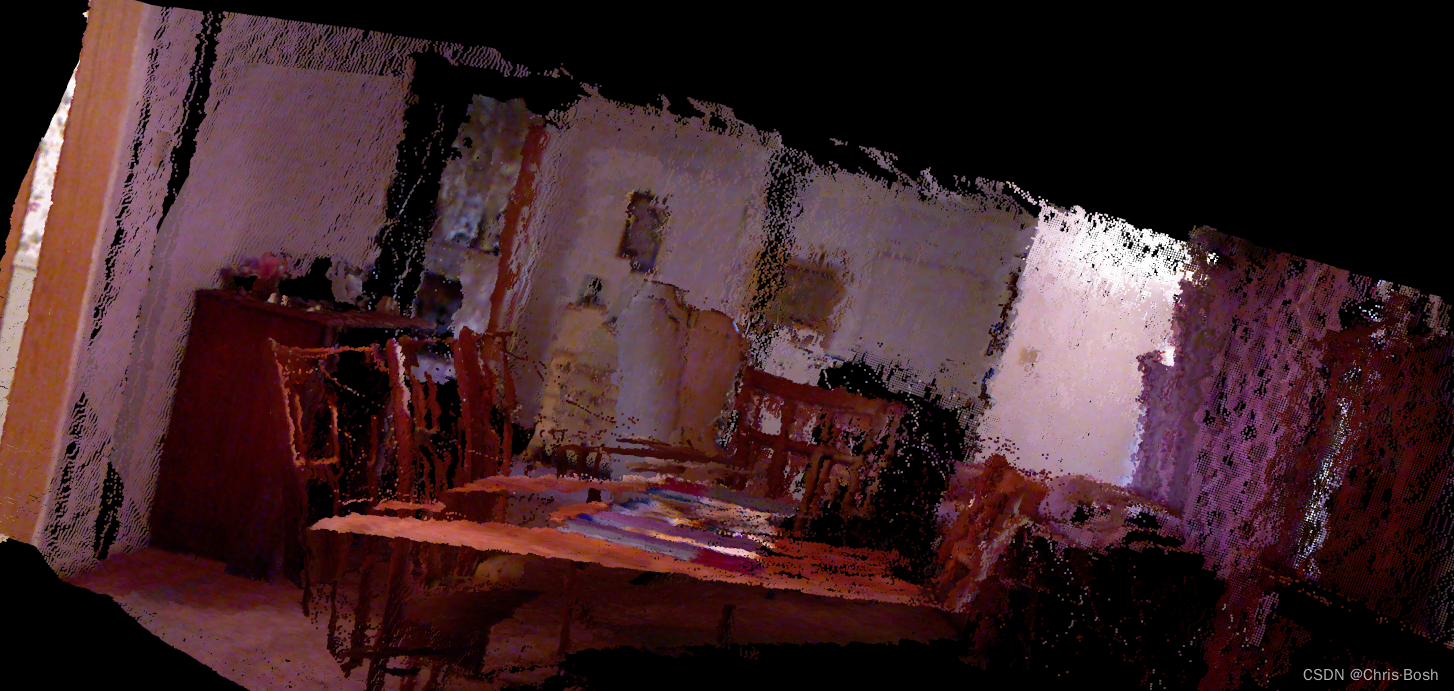
点云图就出来了:
放大点云图: