接网站建设的平台合肥网站优化公司

文章目录
- 前言
- 1. 简介
- 2. 快速开始
- 2.1 onnx转tnn
- 2.2 编译目标平台的 TNN 引擎
- 2.3 使用编译好的 TNN 引擎进行推理
- 3. 手动实现单算子卷积推理(浮点)
- 4. 代码解析
- 4.1 构建模型(单卷积层)
- 4.2 构建解释器
- 4.3 初始化tnn
- 5. 模型量化
- 5.1 编译量化工具
- 5.2 量化scale的计算
- 5.3 量化流程
- 6. im2col实现卷积计算
- 6.1 input为单通道,weight为单通道(输出)
- 6.2 input为多通道,weight为单通道(输出)
- 6.3 input为多通道,weight为多通道(输出)
- 结束语
前言
近期调研了一下腾讯的TNN神经网络推理框架,因此这篇博客主要介绍一下TNN的基本架构、模型量化以及手动实现x86和arm设备上单算子卷积推理。
1. 简介
TNN是由腾讯优图实验室开源的高性能、轻量级神经网络推理框架,同时拥有跨平台、高性能、模型压缩、代码裁剪等众多突出优势。TNN框架在原有Rapidnet、ncnn框架的基础上进一步加强了移动端设备的支持以及性能优化,同时借鉴了业界主流开源框架高性能和良好拓展性的特性,拓展了对于后台X86、NV GPU的支持。手机端TNN已经在手机QQ、微视、P图等众多应用中落地,服务TNN作为腾讯云AI基础加速框架已为众多业务落地提供加速支持。
TNN开源地址:https://github.com/Tencent/TNN
2. 快速开始
2.1 onnx转tnn

&emsp目前 TNN 支持业界主流的模型文件格式,包括ONNX、PyTorch、TensorFlow、TesorFlow-Lite 以及 Caffe 等。如上图所示,TNN 将 ONNX 作为中间层,借助于ONNX 开源社区的力量,来支持多种模型文件格式。如果要将PyTorch、TensorFlow 以及 Caffe 等模型文件格式转换为 TNN,首先需要使用对应的模型转换工具,统一将各种模型格式转换成为 ONNX 模型格式,然后将 ONNX 模型转换成 TNN 模型。

为了简化 convert2tnn转换工具的安装和编译步骤,官方推荐使用docker镜像:
# 建议直接从 docker hub 上拉取镜像
docker pull ccr.ccs.tencentyun.com/qcloud/tnn-convert# 对 docker 镜像进行重命名
docker tag ccr.ccs.tencentyun.com/qcloud/tnn-convert tnn-convert:latest
docker rmi ccr.ccs.tencentyun.com/qcloud/tnn-convert# 通过打印 convert2tnn 的帮助信息来验证下 docker 镜像能够正常使用
docker run -it tnn-convert:latest python3 ./converter.py -h
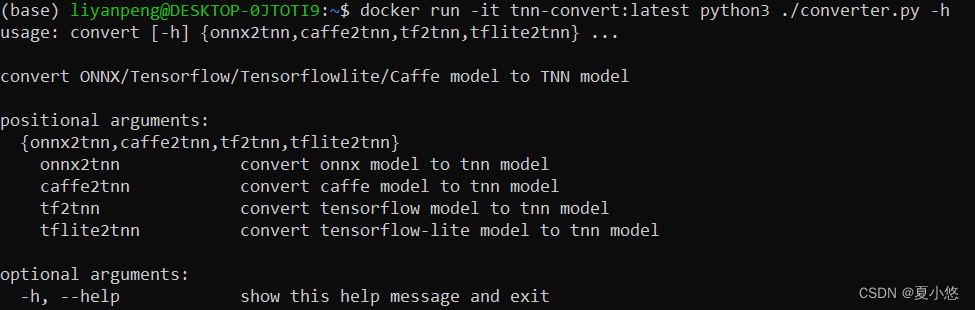
进一步的,查看下ONNX转TNN工具:
docker run -it tnn-convert:latest python3 ./converter.py onnx2tnn -h
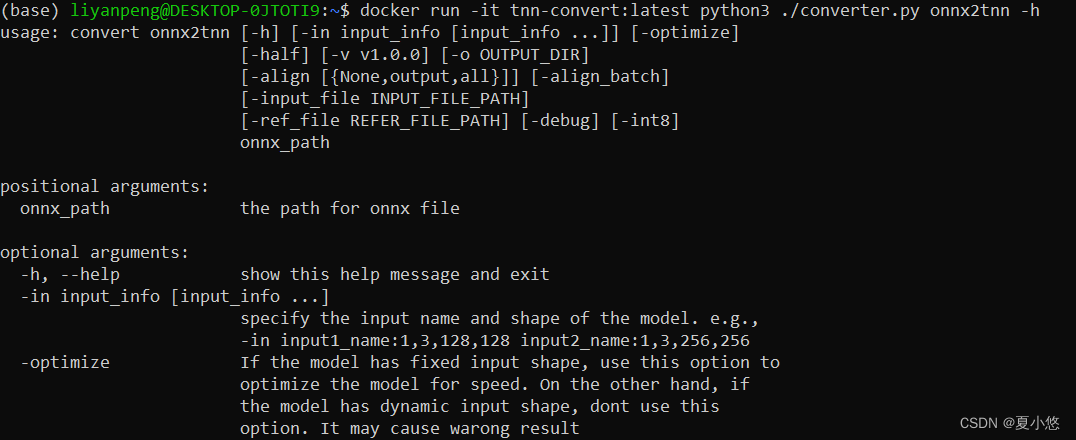
具体参数不再进行过多详述,可参阅官方文档。
本例就以Resnet50为例,将其转为tnn格式:
import torch
from torchvision.models.resnet import resnet50if __name__ == '__main__':model = resnet50()model.load_state_dict(torch.load('model/resnet50-0676ba61.pth'))model.eval()input_data = torch.randn(size=(1, 3, 224, 224), dtype=torch.float32)input_names, output_names = ["input"], ["output"]torch.onnx.export(model, input_data, "model/resnet50.onnx", input_names=input_names, output_names=output_names)
# 当然,也可以直接使用onnx格式的resnet50,下载链接为:https://github.com/onnx/models/tree/main/vision/classification/resnet/model
# 启动docker
docker run -v /home/liyanpeng/tnn_docker:/home/liyanpeng/tnn_docker --rm -it tnn-convert:latest /bin/bash
# cd /opt/TNN/tools/convert2tnn(default)
# onnx2tnn
python3 ./converter.py onnx2tnn /home/liyanpeng/tnn_docker/model/resnet50.onnx -in input:1,3,224,224

2.2 编译目标平台的 TNN 引擎
编译相关注意事项请参考官方文档。
arm-linux平台编译:
apt-get install g++-aarch64-linux-gnu gcc-aarch64-linux-gnu
apt-get install g++-arm-linux-gnueabihf gcc-arm-linux-gnueabihf
# apt-get install vim gdbcd scripts
./build_aarch_linux.sh
x86-linux平台编译:
cd scripts
./build_linux_native.sh

2.3 使用编译好的 TNN 引擎进行推理
上面那个没有编译具体的实例,接下来编译x86平台下各任务下的TNN引擎:
# x86平台编译
cd examples/linux/x86
./build_linux_native.sh# arm-linux交叉编译
# cd examples/linux/cross
# ./build_aarch64_linux.sh


执行图像分类任务:
./demo_x86_imageclassify -p /home/liyanpeng/tnn_docker/model/resnet50.tnnproto -m /home/liyanpeng/tnn_docker/model/resnet50.
tnnmodel -i /home/liyanpeng/tnn_docker/model/tiger_cat.jpg
推理结果也是正确的:

各任务源码位置:
examples/linux/src
3. 手动实现单算子卷积推理(浮点)
TNN框架构建神经网络推理实例需要输入两个文件,一个是模型结构文件.tnnproto,一个是模型权重文件.tnnmodel,这两个文件是必须的。但由于一些特殊的需要,这种文件的方式不太适用,因此我这里提供了一个手动创建模型结构的实例,不用依赖于模型文件。
仿照
examples/linux/src目录下的TNNImageClassify图像分类demo,我在根目录下创建了一个my_cnn_model目录,其中包括my_conv.cpp和CMakeLists.txt两个文件。
my_conv.cpp文件内容如下:
// Author:   xiayouran
// Email:    youran.xia@foxmail.com
// Datetime: 2023/4/8 15:17
// Filename: my_conv.cpp
#include "tnn/core/tnn.h"
#include "tnn/interpreter/abstract_model_interpreter.h"
#include "tnn/interpreter/tnn/model_interpreter.h"using namespace TNN_NS;int main(int argc, char* argv[]) {auto model_type = MODEL_TYPE_TNN;auto device_type = DEVICE_X86;auto data_type = DATA_TYPE_FLOAT;ModelConfig model_config;model_config.model_type = model_type;NetworkConfig net_config;net_config.device_type = device_type;TNN tnn;Status status = tnn.MyInit(model_config);auto instance = tnn.CreateInst(net_config, status);BlobMap input_blobs;status = instance->GetAllInputBlobs(input_blobs);Blob* input_blob = input_blobs.begin()->second;float* data_ptr = static_cast<float*>(input_blob->GetHandle().base);for (int i = 0; i < 1 * 1 * 4 * 4; i++) {data_ptr[i] = (float)1.0 + i;}status = instance->Forward();BlobMap output_blobs;status = instance->GetAllOutputBlobs(output_blobs);Blob* output_blob = output_blobs.begin()->second;float* out_data_ptr = static_cast<float*>(output_blob->GetHandle().base);for (int i = 0; i < 1 * 1 * 2 * 2; i++) {std::cout << out_data_ptr[i] << std::endl;}return 0;
}
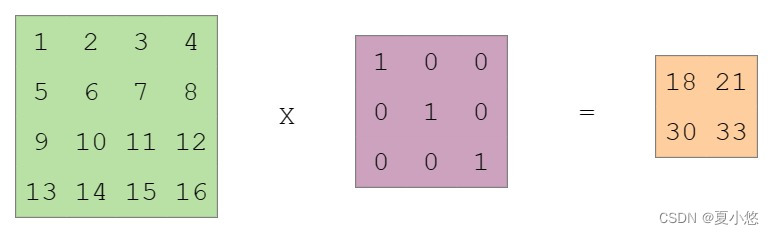
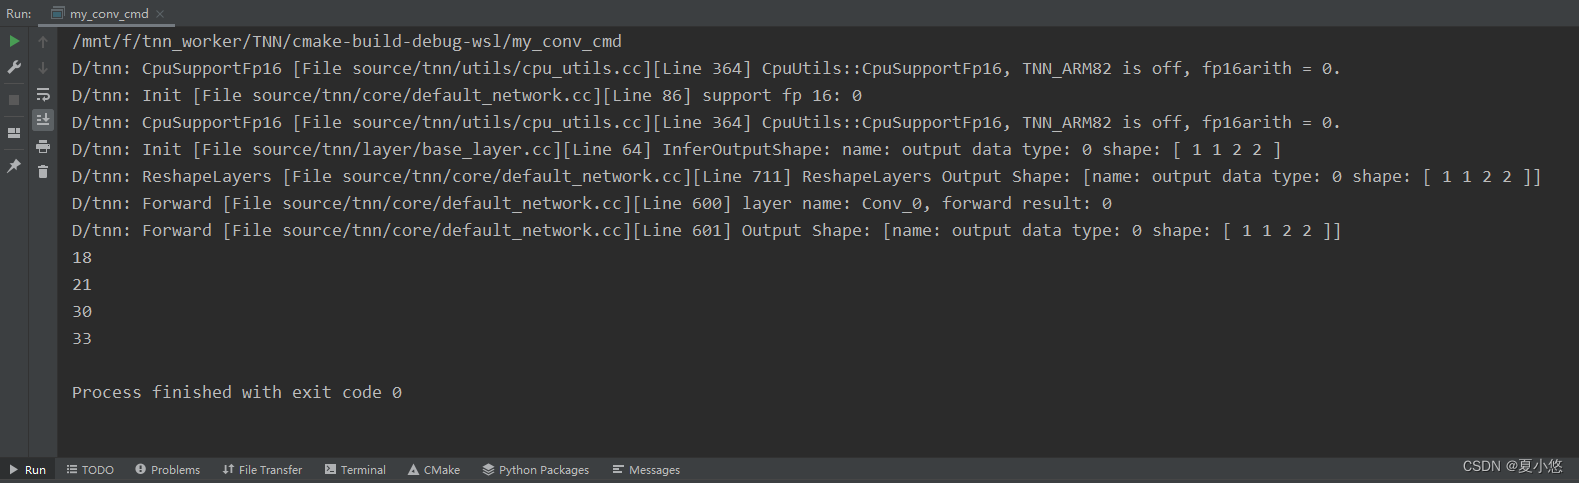
卷积的输入shape为(1, 1, 4, 4),卷积的shape为(1, 1, 3, 3),卷积的输出shape为(1, 1, 2, 2),具体为:
运行结果如下:
在CMakeLists.txt文件中除了添加了本示例代码my_conv.cpp,还添加了官方提供的图像分类demo的TNNImageClassify.cc及其依赖,具体内容如下:
file(GLOB MyCNNModel_SRCS my_conv.cpp)
file(GLOB ImageClassify_SRCS ${CMAKE_CURRENT_SOURCE_DIR}/../examples/linux/src/TNNImageClassify/TNNImageClassify.cc)message(${MyCNNModel_SRCS})
message(${ImageClassify_SRCS})#include_directories(../include)
#include_directories(../source)include_directories(${CMAKE_CURRENT_SOURCE_DIR}/../examples/base)
include_directories(${CMAKE_CURRENT_SOURCE_DIR}/../examples/base/utils)
include_directories(${CMAKE_CURRENT_SOURCE_DIR}/../examples/utils)
add_subdirectory(${CMAKE_CURRENT_SOURCE_DIR}/../third_party/gflags ${CMAKE_CURRENT_SOURCE_DIR}/../third_party/gflags)
get_target_property(GFLAGS_INCLUDE_DIRS gflags INTERFACE_INCLUDE_DIRECTORIES)
include_directories(BEFORE "${GFLAGS_INCLUDE_DIRS}")
link_libraries(gflags)
file(GLOB FLAG_SRC "${CMAKE_CURRENT_SOURCE_DIR}/../examples/linux/src/*.cc")
file(GLOB_RECURSE BASE_SRC"${CMAKE_CURRENT_SOURCE_DIR}/../examples/base/*.cc""${CMAKE_CURRENT_SOURCE_DIR}/../examples/base/utils/*.cc")
file(GLOB_RECURSE UTIL_SRC"${CMAKE_CURRENT_SOURCE_DIR}/../examples/utils/*.cc")include_directories(${CMAKE_CURRENT_SOURCE_DIR}/../source/tnn/interpreter/tnn)
include_directories(${CMAKE_CURRENT_SOURCE_DIR}/../third_party/stb)add_executable(my_conv_cmd ${MyCNNModel_SRCS})
add_executable(demo_x86_imageclassify_cmd ${ImageClassify_SRCS} ${BASE_SRC} ${UTIL_SRC} ${FLAG_SRC})target_link_libraries(my_conv_cmd TNN)
target_link_libraries(demo_x86_imageclassify_cmd TNN)set_target_properties(my_conv_cmd PROPERTIES RUNTIME_OUTPUT_DIRECTORY ${PROJECT_BINARY_DIR})
set_target_properties(demo_x86_imageclassify_cmd PROPERTIES RUNTIME_OUTPUT_DIRECTORY ${PROJECT_BINARY_DIR})
4. 代码解析
按照官方提供的API说明,运行一个神经网络需要五个步骤:
# Step1. 模型解析
model_config.params.push_back(proto_buffer);# proto文件内容存入proto_buffer
model_config.params.push_back(model_buffer);# model文件内容存入model_buffer
Status ret = tnn.Init(model_config);# Step2. 网络构建
auto net_instance = tnn.CreateInst(config, status);# Step3. 输入设定
auto status = net_instance->SetInputMat(input_mat, input_cvt_param);# Step4. 网络运行
auto status = net_instance->Forward();# Step5. 输出获取
auto status = instance->GetOutputMat(output_mat);
在第一步模型解析中涉及到文件操作,理论上只要按照其他模型转tnn的格式写模型文件是不需要修改源码的,这里没有阅读这部分源码,因此就直接修改了源码。
经过源码分析,手动构建一个模型主要需要构建神经网络模型的各层layer并完成参数的初始化、模型解释器及tnn的初始化的构建,具体如下:
4.1 构建模型(单卷积层)
在source/tnn/interpreter/tnn/model_interpreter.cc文件中新增了ModelInterpreter::MyInterpret()函数,区别于官方的ModelInterpreter::Interpret(std::vector<std::string> ¶ms)函数,本函数不需要从文件中去解析模型的结构和权重:
// Interpret the proto and model without file.
Status ModelInterpreter::MyInterpret() {Status status = TNN_OK;/****************初始化卷积层参数****************/NetStructure *structure = GetNetStructure();structure->source_model_type = MODEL_TYPE_TNN;DimsVector &input_shape = structure->inputs_shape_map["input"];input_shape.push_back(1);input_shape.push_back(1);input_shape.push_back(4);input_shape.push_back(4);DataType data_type = DATA_TYPE_FLOAT;// DATA_TYPE_FLOATstructure->input_data_type_map["input"] = data_type;structure->outputs.insert("output");auto cur_layer = std::make_shared<LayerInfo>();std::string type_str = "Convolution";type_str = Transfer(type_str);LayerType type = GlobalConvertLayerType(type_str);cur_layer->type = type;cur_layer->type_str = type_str;cur_layer->name = Transfer("Conv_0");cur_layer->inputs.clear();cur_layer->outputs.clear();cur_layer->inputs.push_back("input");structure->blobs.insert("input");cur_layer->outputs.push_back("output");structure->blobs.insert("output");LayerParam *layer_param = NULL;LayerParam** param = &layer_param;auto p = CreateLayerParam<ConvLayerParam>(param);p->input_channel = 1;p->output_channel = 1;p->kernels = {3, 3};p->strides = {1, 1};p->pads = {0, 0, 0, 0};p->dialations = {1, 1};p->bias = 0;p->pad_type = -1;p->group = 1;p->activation_type = 0;layer_param->type = cur_layer->type_str;layer_param->name = cur_layer->name;if (data_type == DATA_TYPE_INT8) {layer_param->quantized = true;}cur_layer->param = shared_ptr<LayerParam>(layer_param);structure->layers.push_back(cur_layer);/**************卷积层参数初始化结束**************//****************初始化卷积层权重****************/NetResource *net_resource = GetNetResource();LayerResource *layer_resource = NULL;LayerResource** resource = &layer_resource;auto layer_res = CreateLayerRes<ConvLayerResource>(resource);layer_res->filter_format = OIHW;// weightRawBuffer weight_buf;DimsVector weight_dims = {1, 1, 3, 3};weight_buf = TNN_NS::RawBuffer(1*1*3*3*4);weight_buf.SetDataType(data_type);weight_buf.SetBufferDims(weight_dims);float weight_data[1][1][3][3] = {{{{1.0, 0.0, 0.0},{0.0, 1.0, 0.0},{0.0, 0.0, 1.0}}}};memcpy(weight_buf.force_to<float*>(), weight_data, 1*1*3*3*4);layer_res->filter_handle = weight_buf;// biasRawBuffer bias_buf;DimsVector bias_dims = {1};bias_buf = TNN_NS::RawBuffer(1);bias_buf.SetDataType(data_type);bias_buf.SetBufferDims(bias_dims);float bias_data[1] = {0.0};memcpy(bias_buf.force_to<float*>(), bias_data, 1*4);layer_res->bias_handle = bias_buf;// scaleRawBuffer scale_buf;DimsVector scale_dims = {1};scale_buf = TNN_NS::RawBuffer(1);scale_buf.SetDataType(DATA_TYPE_FLOAT);scale_buf.SetBufferDims(scale_dims);float scale_data[1] = {1.0};memcpy(scale_buf.force_to<float*>(), scale_data, 1*4);layer_res->scale_handle = scale_buf;// zero_pointRawBuffer zero_point_buf;DimsVector zero_point_dims = {1};zero_point_buf = TNN_NS::RawBuffer(1);zero_point_buf.SetDataType(DATA_TYPE_INT8);zero_point_buf.SetBufferDims(zero_point_dims);int zero_point_data[1] = {0};memcpy(zero_point_buf.force_to<int*>(), zero_point_data, 1*4);layer_res->zero_point_handle = zero_point_buf;net_resource->resource_map["Conv_0"] = std::shared_ptr<LayerResource>(layer_resource);// 不用解析constant_map/**************卷积层权重初始化结束**************/return status;
}
相应的,需要在source/tnn/interpreter/tnn/model_interpreter.h、source/tnn/interpreter/abstract_model_interpreter.h和source/tnn/interpreter/ncnn/ncnn_model_interpreter.h三个文件中添加本函数的声明:
// model_interpreter.h文件中的ModelInterpreter
virtual Status MyInterpret();// abstract_model_interpreter.h文件中的AbstractModelInterpreter
virtual Status MyInterpret() = 0;// ncnn_model_interpreter.h文件中的NCNNModelInterpreter
virtual Status MyInterpret();
4.2 构建解释器
在source/tnn/core/tnn_impl_default.cc文件中新增了TNNImplDefault::MyInit(ModelConfig& config)函数,函数实现大体与官方的TNNImplDefault::Init(ModelConfig& config)函数一样,只不过这里构建解释器时使用了MyInterpret()函数:
Status TNNImplDefault::MyInit(ModelConfig& config) {auto status = TNNImpl::MyInit(config);if (status != TNN_OK) {return status;}auto interpreter = CreateModelInterpreter(config.model_type);if (!interpreter) {return Status(TNNERR_NET_ERR, "interpreter is nil");}interpreter_ = std::shared_ptr<AbstractModelInterpreter>(interpreter);return interpreter_->MyInterpret();
}
TNNImpl::MyInit(config)函数的实现在在source/tnn/core/tnn_impl.cc文件中:
Status TNNImpl::MyInit(ModelConfig &config) {model_config_.model_type = config.model_type;return TNN_OK;
}
相应的,需要在source/tnn/core/tnn_impl_default.h和source/tnn/core/tnn_impl.h两个文件中添加本函数的声明:
// tnn_impl_default.h文件中的MyInit
virtual Status MyInit(ModelConfig& config);// tnn_impl.h文件中的MyInit
virtual Status MyInit(ModelConfig& config);
4.3 初始化tnn
为了使tnn能够正确按照我们的方法进行初始化,需要添加TNN::MyInit(ModelConfig& config)函数以代替官方的TNN::Init(ModelConfig& config)函数进行初始化,具体在source/tnn/core/tnn.cc文件中:
Status TNN::MyInit(ModelConfig& config) {impl_ = TNNImplManager::GetTNNImpl(config.model_type);if (!impl_) {LOGE("Error: not support mode type: %d. If TNN is a static library, link it with option -Wl,--whole-archive tnn -Wl,--no-whole-archive on android or add -force_load on iOS\n", config.model_type);return Status(TNNERR_NET_ERR, "unsupported mode type, If TNN is a static library, link it with option -Wl,--whole-archive tnn -Wl,--no-whole-archive on android or add -force_load on iOS");}return impl_->MyInit(config);
}
相应的,需要在include/tnn/core/tnn.h文件中添加本函数的声明:
// tnn.h文件中的MyInit
Status MyInit(ModelConfig& config);
至此,手动构建单算子卷积推理所需的要素已经构建完毕,在根目录下的CMakeLists.txt文件中添加本示例的代码目录进行编译即可:
add_subdirectory(my_cnn_model)
5. 模型量化
5.1 编译量化工具
# 编译
cd platforms/linux/
./build_quanttool.sh -c# 执行量化
cd build_quantize/
./quantization_cmd -p /home/liyanpeng/tnn_docker/model/resnet50.tnnproto -m /home/liyanpeng/tnn_docker/model/resnet50.tnnmodel -i /home/liyanpeng/tnn_docker/imagenet128/ -o resnet50
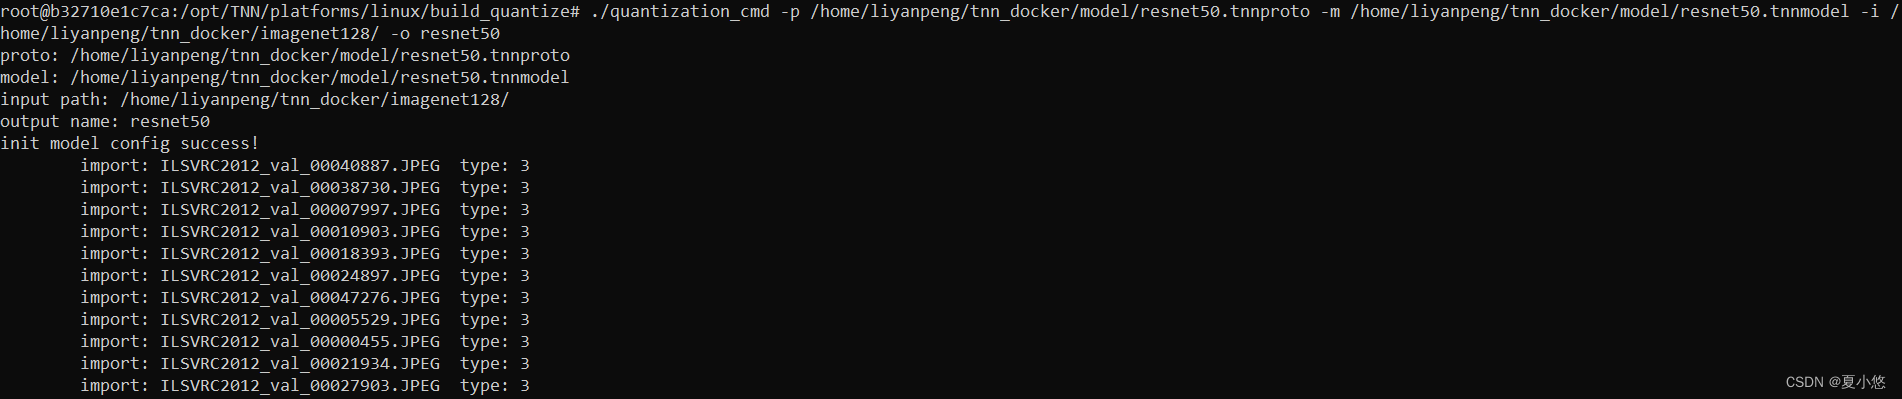
浮点模型大小为98M,量化后的定点模型为26M:


使用量化模型进行推理:
./demo_x86_imageclassify -p /opt/TNN/platforms/linux/build_quantize/resnet50.quantized.tnnproto -m /opt/TNN/platforms/linux/build_quantize/resnet50.quantized.tnnmodel -i /home/liyanpeng/tnn_docker/model/tiger_cat.jpg
这里只是用128张图片进行的量化,所以精度损失较大,推理结果不大对:

5.2 量化scale的计算
这部分主要涉及到量化过程中个scale的计算,包括feature map的scale和算子权重的scale:
feature map的scale计算如下:
float max_val     = std::max(std::abs(range_per_channel_[i].first), std::abs(range_per_channel_[i].second));
valid_channel_[i] = max_val > 0.00001;
if (valid_channel_[i]) {interval_per_channel_[i] = (float)bin_nums_ / max_val;
}int index = static_cast<int>(std::abs(val) * interval_per_channel_[channel_idx]);
index     = std::min(index, bin_nums_ - 1);
distribute_data[index] += 1.0;
// 相当于是统计数据,2048个bar,每个bar中有多少个数据
// 即将feature map中的数据分到2048个bar中// 对于MIN_MAX来说 threshold 为 2047
scale_vec = ((float)threshold + 0.5) / interval / 127.0;
weight的scale计算如下:
// weight_multiby_inputscale[idx] = weight_data[idx] * input_scale_data[s_idx];
// 下面的weight已经是weight*input_scale
auto minmax               = std::minmax_element(weight_start, weight_start + s_size);
float max_val_abs         = std::max(std::abs(*minmax.first), std::abs(*minmax.second));weight_scale[s_idx]    = max_val_abs / 127.0f;
/*
s_size为in_c*k_w*k_h = 3*3*3=27
*/
scale_float2int8 = 1 / weight_scale[s_idx];// quantize weights
for (int i = 0; i < s_size; ++i) {int value         = static_cast<int>(std::round(weight_start[i] * scale_float2int8));weight_q_start[i] = std::min(127, std::max(-127, value));
}// quantize bias
bias_quantized_data[oc] = static_cast<int32_t>(bias_data[oc] / weight_scale_data[weight_scale_idx]);
5.3 量化流程
TNN默认采用Min-Max量化方式,除此之外,feature map支持KL量化方法,weight支持ADMM量化方法,具体的量化流程如下:
calibration.Init(net_config, model_config)
/*根据输入shape,计算出每个网络层的输出shape*/calibration.SetCalibrationParams(cali_params)
/*设置量化方式为MIN_MAX*/calibration.RunCalibration(dataset)
/*scale计算和量化*/CalBlobScale(dataset);// Compute Feature ScaleInitFeatureMap();// Init Feature map(在此之前进行了reshape),初始化每个feature map的range_per_channel_等参数UpdateBlobRange(dataset);// Collect the Range of Feature map,更新range_per_channel_UpdateRange()UpdateBlobDistribute(dataset);// Calculate Distribute of Feature mapResetDistribute()// 根据range_per_channel_计算valid_channel_和interval_per_channel_,并初始化distribute_per_channel_UpdateDistribute()// CalculateScale(scale_vec, zero_point_vec);// Compute Scale of Feature map and save to resource mapQuantizeParams();// Quantize paramsMergeBlobScale();// Merge Blob Scale of some layerscalibration.Serialize(output_name + ".quantized.tnnproto", output_name + ".quantized.tnnmodel")
/*保存量化模型*/
其中range_per_channel_表示每个channel中的最大最小值:first(min),second(max)。
量化源码位置在:
tools/quantization。
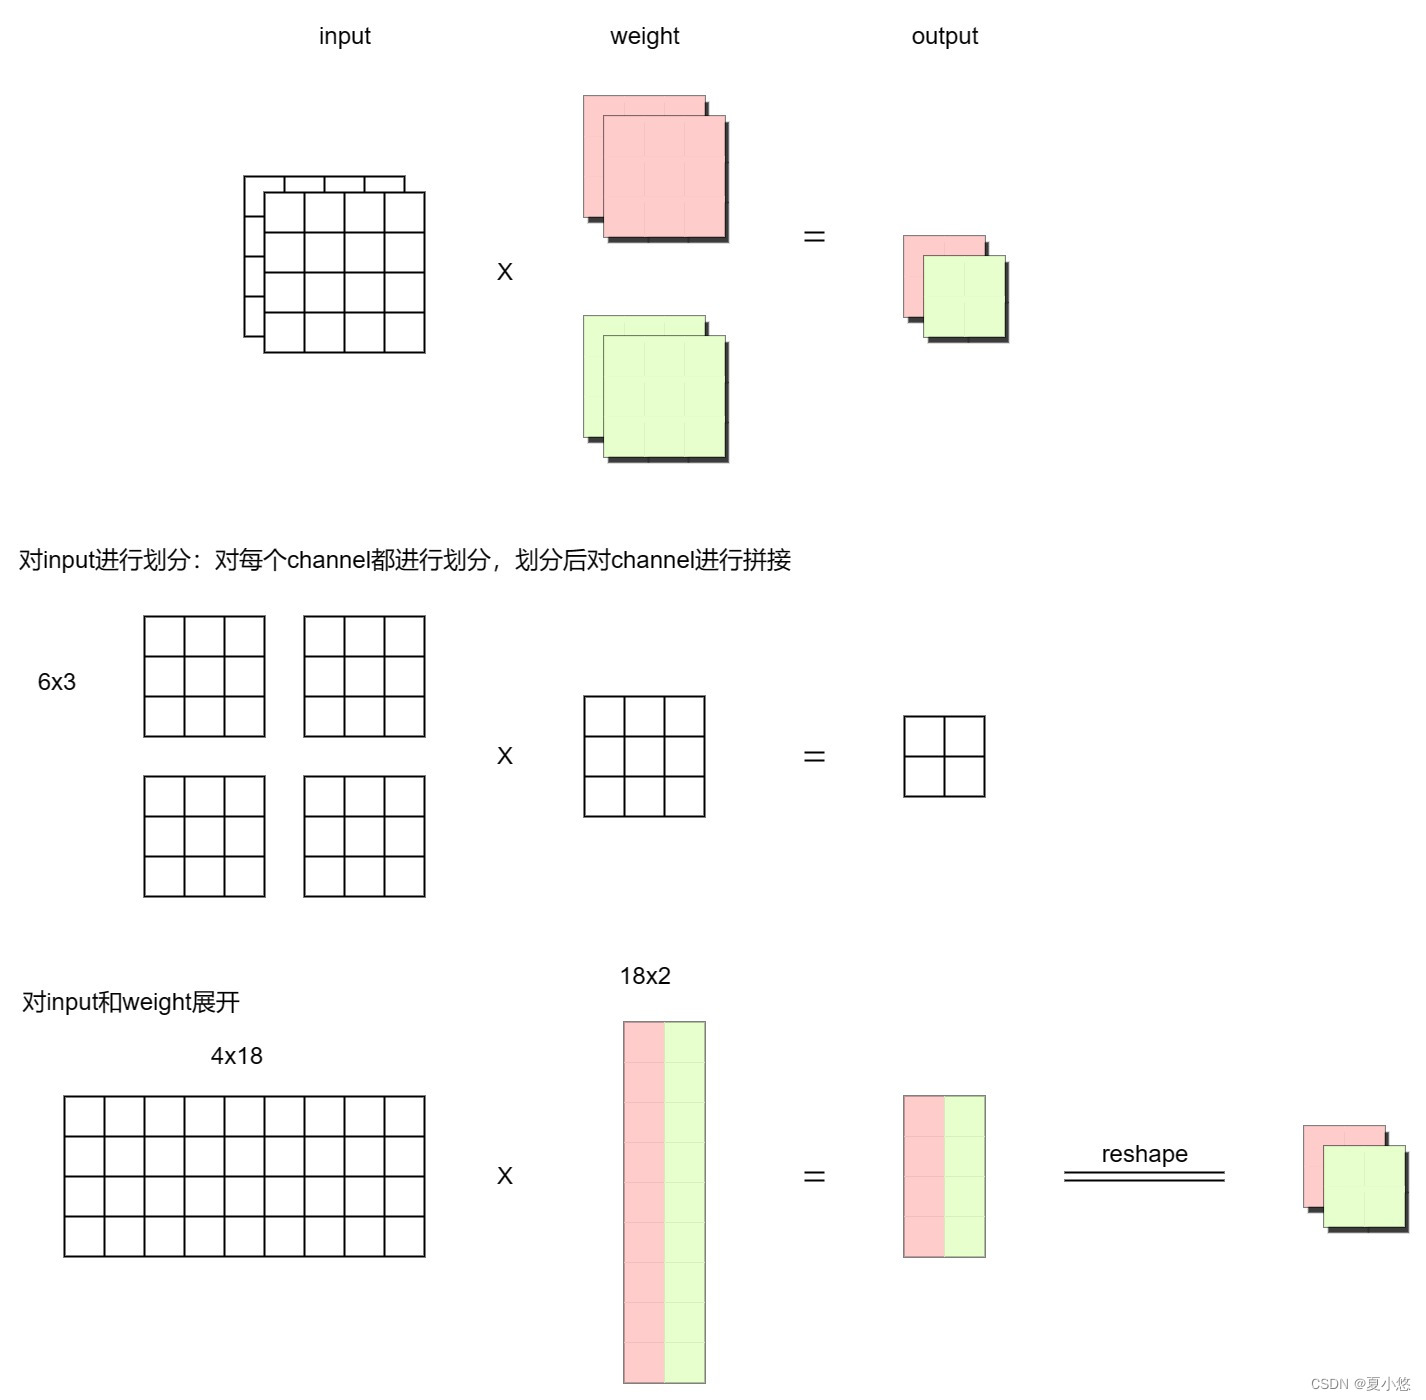
6. im2col实现卷积计算
根据硬件具体实现,大部分卷积的计算都会转换为矩阵乘法(GEMM),最常用的方法就是im2col,下面给出一些im2col实现卷积计算的示例图,结合这篇博客一起食用效果更佳!
6.1 input为单通道,weight为单通道(输出)

6.2 input为多通道,weight为单通道(输出)

6.3 input为多通道,weight为多通道(输出)
结束语
本篇博客主要介绍了TNN的基本使用、量化工具的使用以及手动实现单算子卷积推理,除了浮点卷积推理外,8bit定点卷积推理也有实现,不过目前的结果还没有对上,后续再进行补充8bit定点卷积推理的实现代码。